Linux on the QNAP TS219P II - Part 1 - Serial Console
This article's version history on GitHub
This is the first part in a series on hacking the QNAP TS219P-II network attached storage device to run the Linux kernel and userspace of your choice. For this first installment I’ll focus on getting low-level UART access to the device.
I’m an embedded Linux hacker and that means I want a low-level UART on my devices, which in turn gives me access to a serial console.
A serial console is not a prerequisite for installing a Debian userspace onto your TS219P-II but it presents me with a comfortable environment for recovery if the shit hits the fan. It also makes for a fun 5-minute soldering project. Seriously, it only takes five minutes to wire it up.
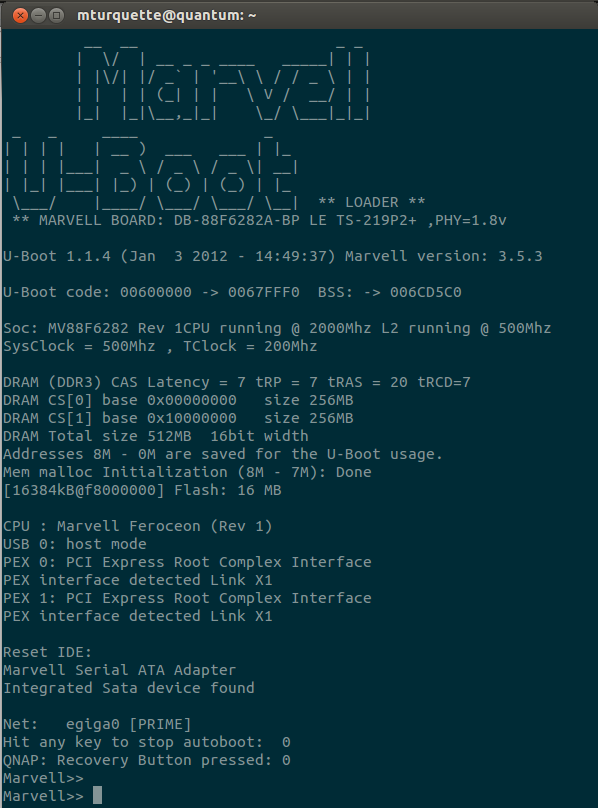
After following these Exact Steps™ you’ll be rewarded with this:

credit where credit is due
I benefited greatly from the info at Martin Michlmayr’s site. There is far more info on Martin’s site than what I plan to publish here. Please check it out for further reading.
UART versus RS-232 versus serial console
First some terminology. Wikipedia defines a UART as, “a piece of computer hardware that translates data between parallel and serial forms”. This basically means that bits shoot across the wire as electric pulses (in serial) and are reconstituted into bytes on the other side (in parallel). So the UART is the physical layer responsible for transmitting data from the host (PC) to the target (TS219P-II).
Related is RS-232 which defines a set of standards for the format of the data sent over the wire and a bunch of other stuff like the size and shape of standard serial port connectors. It’s just a standard that everyone agrees to and which allows the host and the target to talk to each other.
So we’ve got a physical link between the target and host and some standards for how they communicate. Why care? Using this combination it is possible to have a serial console. The serial console in Linux is one of the most basic and low-level mechanisms for an interactive session. It can be used to observe the kernel boot log (useful to debug boot crashes) and userspace can spawn a terminal which in turns runs a shell such as Bourne Shell, BASH, Zsh, Ash, Dash, the list goes on and on. Through this shell one can interact with the system normally as with any UNIX-like system.
You might think, “hey I can do that with telnet or SSH” and you’d be right. But having access to a UART means that you can also have serial communication well before Linux is booted, well before you have a network stack and accesses to services like SSH. Let’s get started.
locating the UART
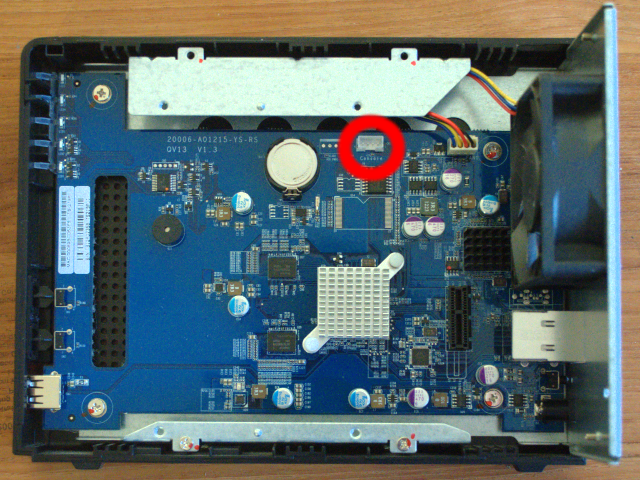
Disassemble the device such that the hard disks, hard disk cages and cage enclosure have been removed along with the PCIe SATA expansion card. Lay the device on it’s side and align it so that the RTC backup battery (coin cell) is at the “top”. The UART pins are just to the right of it, marked “console” on the silkscreen. I have circled it in red in the photo below:

parts
phr-4 connector
Get this from ye olde sparkfun.
reuse, renew, recycle
Old CD-ROM audio cables use the same PHR-4 connectors and can be hacked up if you have one lying around. I do not recommend that you buy one new since the part from sparkfun is so darned cheap. But maybe you can get a good deal at the local salvage yard…
level shifter
I like the Droids SAS Serial Adapter RS232-TTL from robotshop.com. You can find cheaper level-shifters for serial communications but this one uses the MAX3238E for real 3.3V operation on the target side and also exposes all the handshaking lines from a female DB-9 connector. You won’t need more than VCC, GND, TX & RX for this project but some day those extra lines might be handy.
voltage thieves in the night
Some RS232-to-TTL converters use a technique to steal voltage from the 12V host instead of using a real level converter like the MAX3238E mentioned above. These seem to work well on many projects and lots of folks have good luck with them. I suspect some of the hackers employing this type of shifter do not even realize the difference between it and the Droids SAS model mentioned above. However some times this design doesn’t work in situations where one thinks it would. This leads to premature hair loss. We want to avoid premature hair loss.
theory of operation
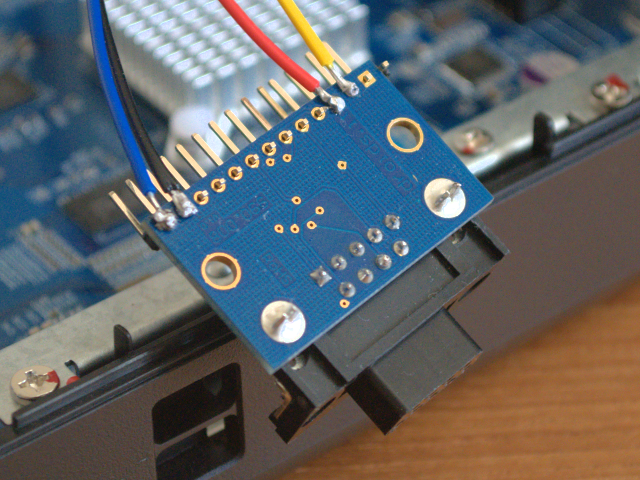
The female DB9 connector on the host side of the level converter plugs into the serial port of your PC. It’s VCC line is 12V, but don’t worry about that since the level shifter chip on the Droids SAS board takes care of this for us. On the target side of the board will be a bunch of pads for us to solder. For the 4-pin UART on the TS219P-II we only need VCC, GND, TX & RX. I chose to solder the headers on the bottom of the board and glob the wires from the PHR-4 connector to the relevant pins. You might handle it different if you have jumper wire with a nice socket on the end that can plug into the header directly.
We want to connect the VCC pin from the target UART to VCC on the level converter board, and likewise we want the target UART GND pin to line up with GND on the board. RX & TX are tricky and this causes much confusion. We want the TX pin on the target UART to connect to RX on the level converter board and the RX pin on the target UART to connect to TX on the board. This is because the TX/RX on the Droids SAS board are representative of the TX/RX pins coming from the host (PC) side, and not representative of the target (QNAP TS219P-II).
console pinout
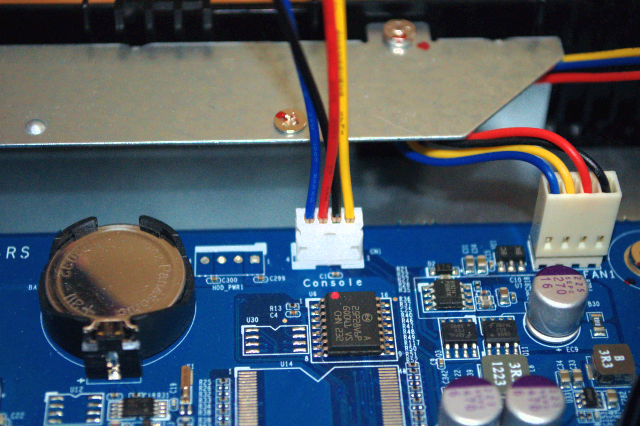
The pinout below is from left to right if you are looking at your device as pictured below. I have also added the wire colors for my particular setup.
pin0 (blue) GND\
pin1 (red) rx (tx on the level shifter)\
pin2 (black) VCC\
pin3 (yellow) tx (rx on the level shifter)

For readers following this guide for a different (but similar) device the section below should you how to safely figure out each pin’s function.
probe the device
Keep the device powered off. Using your multimeter’s continuity feature, put one lead on a metal part of the enclosure and the other lead touching a single pin. Only one of them should result in a closed loop and that pin is GND.
Power on the device. Set your multimeter to measure in the 3V range and probe the remaining 3 pins. You might see moving voltage values on two of your pins. Those are the RX/TX lines. The pin that gives you a rock solid 3V is VCC.
The two data lines, RX & TX will be covered below.
UART dyslexia
Using the level shifter confuses some people, with respect to RX and TX lines. This is easy to bungle and often the RX/TX wires are swapped incorrectly… a condition known as UART Dyslexia. It is also easy to avoid in this simple case. Just create contacts with the pins where you think they should go and then boot the board and see if you get a U-boot prompt. If not then swap the wire contacting RX/TX on the level converter board and try again. Once you get it right then solder them in place before you forget!

fruits of your (5-minute) labor
Plug a serial cable into the level converter board and your PC then use your favorite serial console application. I personally enjoy using GNU Screen. Try the following:
$ screen /dev/ttyUSB0 115200,cs8,-ixoff
The TTY that you use will vary based on whether it is a USB-to-serial adapter (like mine) or a “real” adapter like the 8250 or 16550 soldered to your motherboard or perhaps on a PCI expansion card. The factory software on the target configures the UART to run at 115200 Baud, which is why I do the same when I invoke the screen session above.
Now power on the target and if all goes well you’ll see the bootloader, then fly past Linux booting and eventually get a Linux login prompt. Type “admin” for both the username and the password and now you’ve got a shell!
bc.. Welcome to TS-219(169.254.100.100), QNAP Systems, Inc.
NASCD53F5 login: admin\
Password:
In the next segment I’ll cover updating the Linux kernel and userspace (stored in flash memory) to something more modern. If I’m lucky I’ll also update to a newer U-boot, perhaps one that can pass DeviceTree blobs to the Linux kernel. Happy hacking!